Monday, April 20, 2015

Review: Craftsman XSP 12 Gallon 5.5 Peak HP Wet/Dry Vac

I stopped at the Sears near my work on the way home and bought a Craftsman XSP 12 Gallon 5.5 Peak HP Wet/Dry Vac. http://craftsman.com/craftsman-xsp-12-gallon-5.5-peak-hp-wet-dry/p-00912006000P  

(My little man helping me unbox the new vacuum.)

This is the last of the "big" tools on my want list until I save up enough money to buy the Miller welder I want. 

I wanted a shop vac with the larger 2.5 inch hose and this is the smallest of the craftsman ones that has this option. I looked at a few other shop vacs online but this one claimed to have more HP than others in its class and happens to be the same one we have at work, so I know it's a quality machine. 

This thing is a beast. It comes well packed in a huge box that barely fit in the passenger seat of my car. 


The hose, wheels, etc are shipped inside the canister, which makes a lot of sense when you think about it. 


The wheels don't come on the vac and have to be installed using four little screws. 

Flip the vac over. 

Slide the wheels into the little grooves.

Make sure the screw hole lines up. 

Remove screws from plastic package.

Drive screws into holes using a screwdriver. I use my drill for driving 90% of the screws I need to do. 


Once the wheels are on, flip the canister back over, put the top motor part back on, attach the hose, plug it in, and start vacuuming.

Before

After

The hose can wrap around the outside of the canister and store there easily with two huge hooks on the side top, the accessories are pushed onto reverse cups on the wheels and store there when not in use. 

This thing is going to make keeping the garage clean MUCH easier than it was when I was just using a broom. We use the one at work for pulling all the packing peanuts out of a box when unpacking stuff and it can easily empty a box of packing peanuts without the hose getting clogged or the canister getting full. 

My kids thought it was especially cool when I attached the hose to the output side and turned the thing isn't a blower. 

Bottom line, I wold highly recommend this vacuume to anyone looking for a good high power wet dry vac with a large hose size. 

Bonus tip, go buy this in your local sears store, it was on sale online for $10 off the normal price, but the in store price ended up being even less than that.

Saturday, April 11, 2015

Garage Workbench Build: Day Six and Seven

Last night after work I finished building the frame for my workbench. 


I put the cross supports at one foot centers because that's what they did for a workbench I looked at the plans for online. 

I also moved one of the support brackets for my garage door rails as it was at exactly the same height as the bench will be and the bench will go out all the way to touch these rails when installed. 


Today I actually installed the workbench. 


I put a level line on the wall at the height I wanted the workbench, measured down 4.25 inches from there, and put screws in the wall just below that point for the bench to sit on until I got it fastened to the wall. 


I am doing a slanted support on the left end instead of going straight down to the ground. 

I marked and cut the angles at the bottom first, then at the top, then fastened it in place, and repeated the process for a second board. 

I ended up having to take this second board off again later when I realized it was covering one of the bolt holes for my bench vise. 

The bench was lag bolted to the wall at every stud. 

At this point I ran the wires for the outlet on the front of my bench using an aluminum conduit, but didn't get any pictures of this step. 

Finally I put the top plywood board on, screwed it down, sealed it with a 3m spray on sealer, and mounted my bench vise. (I did have to run to the store to buy new bolts before mounting the vise because the first set I bought was too short.)


I am really happy with how this is going. 


Thursday, April 9, 2015

Garage Workbench Build: Day Five

My Yost 750 DI bench vise arrived at Home Depot on Tuesday and I picked it up after dinner. That was the last thing I was waiting on before I could start working on the actual workbench.

I wanted to start work on building the workbench on Wednesday, but we had hail forecast so the garage was full of cars, leaving no room to work in there. I did pickup some bolts to bolt down the bench vise and some lag bolts for bolting the workbench to the wall on my way home from work, but otherwise I didn't get anything done on the workbench that day.  

Tonight I started building the frame for the bench itself and cut the plywood for the top.

First, I marked and drilled holes in the 2x4s for bolting the bench vise down, then routed the screws for screwing it together around those holes. 


I drilled 5/8ths inch holes since that was the size bit I have, but only bought 1/2 inch bolts. The mounting holes in this bench vise can handle a 5/8ths inch bolt, but those seemed huge at the store and I couldn't find lock nuts for them. I figure I will start with the 1/2 inch bolts and I can always upgrade easily later if I decide I need or want to. 


I am going to build my kids their own rolling workbench using this piece pf plywood for the top and bottom because they asked for a workbench for them.


This piece is going to be the top of the workbench. 

This piece will be used to put a solid side on the left end of the workbench. 

This weekend I am hoping to get the rest of the frame for the workbench put together and get it mounted to the wall.


Saturday, April 4, 2015

Garage Workbench Build: Day Four - Outlets

I wired up a few outlets for the workbench today. I haven't actually tied in to the house power yet, but I did run the wires to where I am going to tie in to the power. I didn't take any pictures, but I figure almost all outlets look the same so that isn't a real loss. :-)

There are two different electrical circuits accessible from the garage without too much trouble and I tied different outlets into each of these so I can pull more power at the bench at one time.

Thursday, April 2, 2015

Garage Workbench Build: Day Three - Holes

Today's progress consisted of:

1. Cleaning out the workbench area because we stuffed a bunch of stuff there the other day so we could get both cars in the garage during a storm.

2. Putting some holes in the studs in my garage wall with a 5/8ths inch drill bit to run electric wires.

(I won't bore you by posting pictures of every hole I drilled.)

In other news I ordered a bench vise for my workbench last night. The Craftsman one is apparently not being made anymore or something, so after a bunch of research I decided on the Yost 750 DI http://m.homedepot.com/p/Yost-5-in-Heavy-Duty-Multi-Jaw-Rotating-Combination-Pipe-and-Bench-Vise/202786343/

This is a multi jaw rotating pipe and bench vise that was 1st on a list of the best bench vises of 2015. It is made of 60,000 lbs Ductile Iron and weighs 63lbs.

I ordered this shipped to store at the Home Depot up the street so I can inspect it for damages before I accept the shipment. 

I will post a review after it comes in. 

Wednesday, April 1, 2015

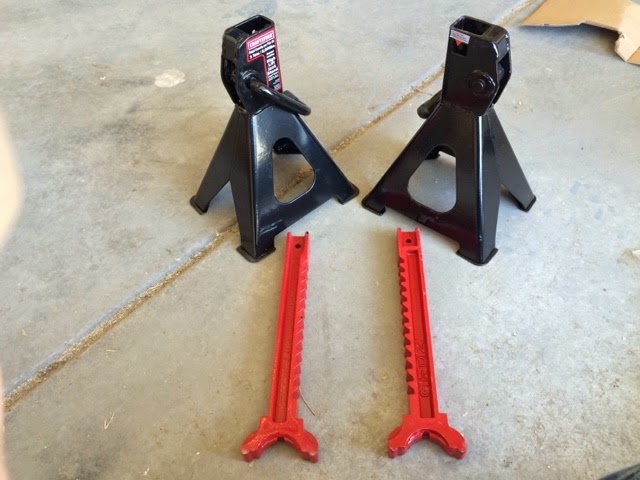
Review: Craftsman High Lift Jack Stands


I bought these a couple weeks ago from Sears and finally got around to unboxing them today. They cost me $32.43 with tax. 


They are decently packaged and I doubt they would be damaged even if the box got dropped or thrown around. 


That's my son biking by in the background below. He really wanted me to try these out. 


I am a little leery of the way the latching mechanism lets go. As long as there is weight on the jack stand it should be secure, but I wish it wasn't so easy to lift the handle and drop the jack stand to its lowest setting. Otherwise these seem sturdy and well built. 

Now for the bad news. The instructions clearly say I can't use these for any of the things I bought them for. 

The only authorized use is using two jack stands to lift one end of the car. 

You are not supposed to use these to lift one side of the car, so they are not meant for rotating tires. 

You are also not supposed to use more than two of these on the car, so no using four of them to lift the entire car and work under it. 


So my only options are to not use these for supporting the mustang during the restoration and buy others that are meant for this, if such a thing exists, or to ignore the clearly stated safety instructions.

Bummer. 

I will keep these anyway as the blogs I read show a lot of other uses for Jack stands during a restoration, like supporting the read axel when you take it off the car. 

I can't recommend these to anyone else though as these limitations mean these are a lot less useful than I hoped they would be.